• Skip to primary navigation
  • Skip to main content
  • Skip to primary sidebar
Cooking My Dreams
  • Recipes
  • Online Cooking Classes
  • Work with me
    • Portfolio
menu icon
go to homepage
subscribe
search icon
Homepage link
  • Recipes
  • Contact
  • Online Cooking Classes
  • Work with me
  • Subscribe!
    • Email
    • Facebook
    • Instagram
    • Pinterest
  • ×

    Home » Crafts » How to make a DIY Scrunchie

    How to make a DIY Scrunchie

    Published: Mar 22, 2020 · Modified: Nov 24, 2021 by Jessica Montanelli · This post may contain affiliate links.

    Sharing is caring!

    0 shares
    • Share
    • Tweet
    • WhatsApp
    • Yummly
    • Email
    Jump to Instructions Print Instructions

    A cute and quick little project for your weekend. All you need is a couple of materials and you can whip up a scrunchie in just 5 minutes!

    feelings. A simple object can help us to experience that blast from the past instantly. Something like a retro fashion accessory. A neat and useful hair accessory perhaps?

    Scrunchies were very popular some time ago, and as we all know well, fashion trends tend to come back around every few decades or so. Which means that it’s a great time to start bringing back those practical and cute scrunchies. And what better way to do that than by making them on your own? They are super easy to sew and I’ll show you how in this quick tutorial. Once you get the hang of it, you can whip up a scrunchie in just 5 minutes. You can make a dozen in different colors to match your outfits. If you want to upgrade make a scrunchie with bow or add a thin lace or a ribbon to the end seam for an extra wow!

    Let’s see how you can make an easy scrunchie. This project is a quick one and as such, it doesn’t require a lot of materials.

    Instructions

    Print Recipe
    No ratings yet

    How to make a Scrunchie
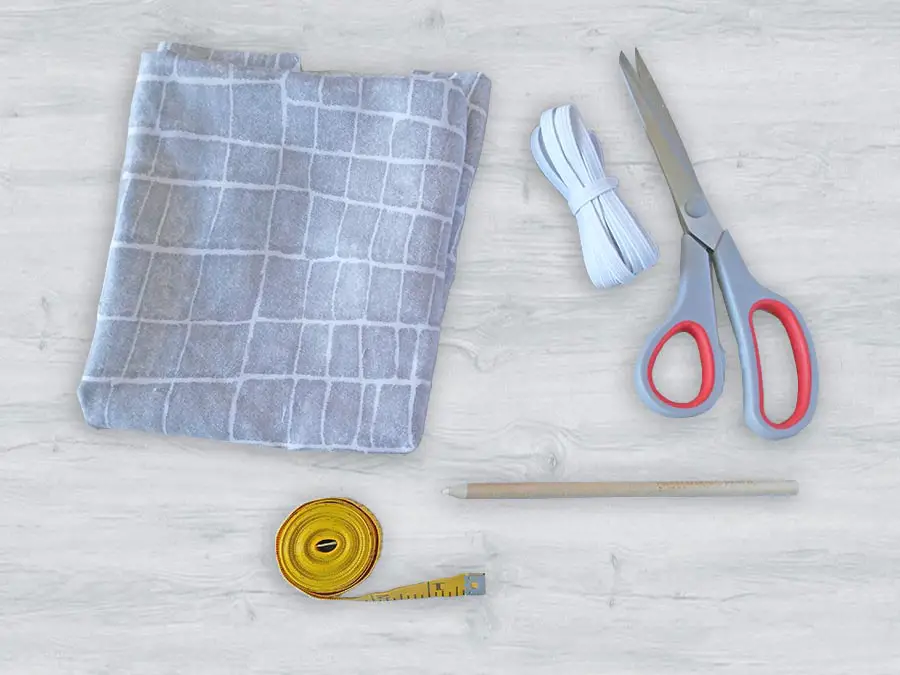
    A cute little project to make a handmade scrunchie in just 5 minutes.
    Prep Time2 minutes mins
    Cook Time3 minutes mins
    Total Time5 minutes mins
    Servings: 1 scrunchie
    Author: Jessica Montanelli

    Ingredients

    • Non-stretch Fabric
    • ¼ inch Elastic
    • Pins
    • Safety Pin
    • Scissors
    • Sewing machine optional, you can handsew the scrunchie

    Instructions

    • Measure and cut the fabric. Your fabric needs to be cut into a 4 x 22 inches strip (or 3.5" x 18" if you are making a mini scrunchie).
    • Fold the last quarter of an inch of the short edge, press it and stitch it to get a finished edge.
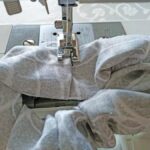
    • Fold the strip in half lengthwise and pin the edges together, right sides on each other.
    • Sew along the open edge lengthwise with a quarter inch allowance.
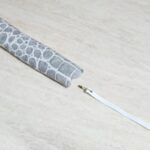
    • Turn the tube inside out and insert the elastic. Attach a safety pin to one end of the fabric tube youjust made and pull it through the tube to flip the whole thing inside out.
    • Cut the elastic down to an 8 inches long strip.
    • Attach a safety pin to its one end and thread it through the tube.
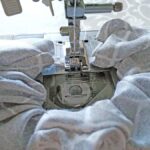
    • Make sure that the elastic is flat inside the tube and then sew across the overlapped elastic ends.
    • Sew back and forth to reinforce the stitching and provide it with enough durability to resist stretching.
    • Sew both ends of the scrunchie together by putting one of the ends through the other, open end. Position it well and make sure that nothing is twisted before you sew it together in place. Stitch across the ends you just tucked into each other.
    photo of a handmade scrunchie

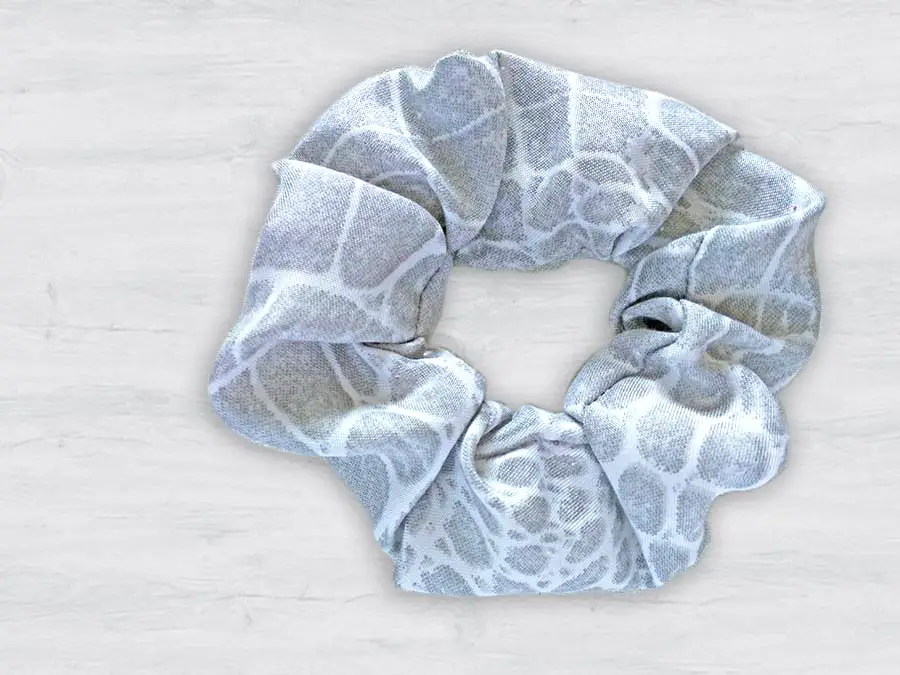
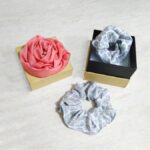
    You just got yourself a new scrunchie right there. And it only took three simple steps. Now go make yourself a second scrunchie, or a dozen!

    These make a fantastic gift, so now you can make a handmade gift for your besties!

    If you are looking for more handmade gift ideas, you can make this fun embroidered T-shirt, stunning crepe flower centerpiece or sew a gorgeous fabric flower and stun anyone who gets treated to receiving it.

    I hope you had fun reading this tutorial article. I also hope you will enjoy wearing these cute and practical scrunchies. Make them in various colors and combine them with any clothing combination you have!

    « Italian Artichoke Dip
    Pasta with Tuna Tomato Sauce »

    Sharing is caring!

    0 shares
    • Share
    • Tweet
    • WhatsApp
    • Yummly
    • Email

    Reader Interactions

    Leave a Comment Cancel reply

    Your email address will not be published. Required fields are marked *

    Recipe Rating


    This site uses Akismet to reduce spam. Learn how your comment data is processed.

    Primary Sidebar

    Hi, I'm Jessica! I'm an Italian who moved to the Netherlands with a true passion for food, travel, and everything handmade. I love to experiment, learn new skills, and share my knowledge about everything I do!

    This blog is my perfect escape to search for my path towards happiness. :)

    More about me →

    • jess.cookingmydreams
    • Cooking my Dreams
    • jess.cookingmydreams

    Popular Recipes

    • overhead plate with salmon ravioli in cream sauce
      Ricotta and Smoked Salmon Ravioli
    • black pepper with pici cacio e pepe pasta with a fork
      Pici Cacio e Pepe (Tuscan Pasta with Creamy Cheese and Black Pepper Sauce)
    • Spinach and Ricotta Cannelloni
      Classic Spinach and Ricotta Cannelloni
    • Classic Tuscan Lasagna
    • stack of frozen mirepoix portions
      Soffritto (Mirepoix): What it is, how to use and how to freeze
    • overhead photo of black plate with pasta
      Pasta with Easy Creamy Eggplant Sauce

    Subscribe and get a Free E-Cookbook

    ebook page that says 10 classic tuscan recipes.

    As Seen In

    Spring Recipes

    • overhead of raspberry ricotta cake with two cut slices
      Soft Raspberry Ricotta Cake with Chocolate Chunks
    • 2 portions of smoked salmon tartare with a fork
      Smoked Salmon and Avocado Tartare
    • fork holding half mushroom ravioli on a plate
      Wild Mushroom Ravioli (with Creamy Garlic Parmesan Sauce)
    • hand holding jug pouring chocolate glaze over mini bundt cakes
      Raspberry Chocolate mini Bundt Cakes

    Follow me

    • Email
    • Facebook
    • Instagram
    • Pinterest
    • Twitter

    Footer

    ↑ back to top

    About

    • Privacy Policy
    • Cookie Policy
    • Accessibility Policy

    Newsletter

    • Sign Up! for emails and updates

    Contact

    • Contact
    • Work with me
    • Portfolio
    • Cooking Classes

    As an Amazon Associate I earn from qualifying purchases.

    We use cookies on our website to give you the most relevant experience by remembering your preferences and repeat visits. By clicking “Accept”, you consent to the use of ALL the cookies.
    I refuse.
    SettingsAccept
    Privacy & Cookies Policy

    Privacy Overview

    This website uses cookies to improve your experience while you navigate through the website. Out of these cookies, the cookies that are categorized as necessary are stored on your browser as they are essential for the working of basic functionalities of the website. We also use third-party cookies that help us analyze and understand how you use this website. These cookies will be stored in your browser only with your consent. You also have the option to opt-out of these cookies. But opting out of some of these cookies may have an effect on your browsing experience.
    Necessary
    Always Enabled
    Necessary cookies are absolutely essential for the website to function properly. This category only includes cookies that ensures basic functionalities and security features of the website. These cookies do not store any personal information.
    Non-necessary
    Any cookies that may not be particularly necessary for the website to function and is used specifically to collect user personal data via analytics, ads, other embedded contents are termed as non-necessary cookies. It is mandatory to procure user consent prior to running these cookies on your website.
    SAVE & ACCEPT
    0 shares